Often when we are learning a new craft, theres a lot to take in. With needle felting, for example, you are learning how to judge what fibre and needles you have. How to know what the right amount of fibre would be for each part. You'll be learning how to shape the limbs and to thread joint them all together! So yet another thing you need to learn is making a nice, simple nose.
Often it's these things that we neglect to learn more about. We just muddle through when we get to this part and hope for the best. But the nose is just as important as the eyes and ears, the balance of the face really effects how your little character will turn out, and whether he is stern, cute, lovable, sad etc.
For this tutorial I'm going to take you through making a basic nose, this is how I make most of my noses, I rarely get more technical unless I've made something larger or more deserving of something extra special. Why get super complicated if you don't have to right?
So to start off with you will already have your head and be ready to start the nose. I use the finest crochet thread you can find, this is thick and usually I use black or brown, but you can also use embroidery thread (the kind that comes as 6 threads together) and just split it into 3 threads or less. Thread it onto a longish needle (one that can go right through your head as you will need to do that a couple of times) and use it as a single length with no knot.
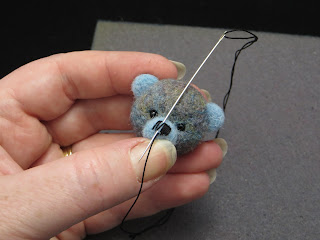
In the photo above you can see the needle has gone into the back of the bears head and the point is coming out roughly where the lower bottom corner of the nose would be. Pull the thread until the end just disappears into the back of the thread.
Here you can see me taking the needle into what would be the top of the nose, above where the thread is coming out. We will be doing a running kind of stitch, making loops in and out along the nose.
You can see above I have made several stitches, working across the nose from one side to the other. It doesn't matter at all that there are gaps in the stitching, this is what makes it perfect for a low stress, easy for beginners, nose!
We will fill in the nose by working back across to where we started and we can do this as many times as we need to, just try to make sure that the loops form a straight line on the nose, but you can work diagonally from one area to another when you take the thread into the nose and out where you need another stitch.
Once you have filled in the entire rectangle and you are happy with the size and shape you can finish with your thread coming out at the centre bottom. This is so we can now make the mouth.
Pull the thread down to check placement, and decide how long you want to make this line.
You can see here that I'm taking the thread into the bottom of this line, and out to the side, where I want the mouth to go. Pull this through but not too tightly.
Here I have turned the head upside down so that I can take the thread back into the end of the line we just made, and out to the other side to create the second half of the mouth. This will form a 'Y' shape when we are done.
When you pull the thread through you will have stitched one side and have the thread ready to go back into the bottom of the line again to finish the second stitch. When you make this last stitch take the needle into the bottom of the line, and right out through the back of the head.
To finish run the needle back and forth a couple of times in the back of the head. You will take a stitch in exactly where the thread is coming out, bring it across the back of the head in a large stitch and exiting somewhere else on the back of the head. Do this at least twice so that you have anchored off and not made any stitched. Pull firmly and cut under tension so that the thread disappears back into the head.
And you are done! If you have any dimples at the back of the head you can either firmly scratch then with your thumb nail if they aren't too deep, or lightly felt a small amount of fibre into the dent to hide it. I find that scratching this patch and felting again helps to hide it more.
I hope these tips help and that you find my method for making a nose and mouth useful for your future bears, cats, rabbits and more!
Happy felting!


No comments:
Post a Comment