Tuesday, 1 February 2022

Sewing a nose on your handmade bear, bunny, cat etc! Free Tutorial


Often when we are learning a new craft, theres a lot to take in.  With needle felting, for example, you are learning how to judge what fibre and needles you have.  How to know what the right amount of fibre would be for each part.  You'll be learning how to shape the limbs and to thread joint them all together!  So yet another thing you need to learn is making a nice, simple nose.  

Often it's these things that we neglect to learn more about.  We just muddle through when we get to this part and hope for the best.  But the nose is just as important as the eyes and ears, the balance of the face really effects how your little character will turn out, and whether he is stern, cute, lovable, sad etc.

For this tutorial I'm going to take you through making a basic nose, this is how I make most of my noses, I rarely get more technical unless I've made something larger or more deserving of something extra special.  Why get super complicated if you don't have to right?


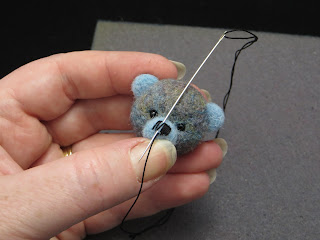
So to start off with you will already have your head and be ready to start the nose.  I use the finest crochet thread you can find, this is thick and usually I use black or brown, but you can also use embroidery thread (the kind that comes as 6 threads together) and just split it into 3 threads or less.  Thread it onto a longish needle (one that can go right through your head as you will need to do that a couple of times) and use it as a single length with no knot.

In the photo above you can see the needle has gone into the back of the bears head and the point is coming out roughly where the lower bottom corner of the nose would be.  Pull the thread until the end just disappears into the back of the thread.

Here you can see me taking the needle into what would be the top of the nose, above where the thread is coming out.  We will be doing a running kind of stitch, making loops in and out along the nose.


You can see above I have made several stitches, working across the nose from one side to the other.  It doesn't matter at all that there are gaps in the stitching, this is what makes it perfect for a low stress, easy for beginners, nose!


We will fill in the nose by working back across to where we started and we can do this as many times as we need to, just try to make sure that the loops form a straight line on the nose, but you can work diagonally from one area to another when you take the thread into the nose and out where you need another stitch.


Once you have filled in the entire rectangle and you are happy with the size and shape you can finish with your thread coming out at the centre bottom.  This is so we can now make the mouth.
Pull the thread down to check placement, and decide how long you want to make this line.


You can see here that I'm taking the thread into the bottom of this line, and out to the side, where I want the mouth to go.  Pull this through but not too tightly.


Here I have turned the head upside down so that I can take the thread back into the end of the line we just made, and out to the other side to create the second half of the mouth.  This will form a 'Y' shape when we are done.


When you pull the thread through you will have stitched one side and have the thread ready to go back into the bottom of the line again to finish the second stitch.  When you make this last stitch take the needle into the bottom of the line, and right out through the back of the head.
To finish run the needle back and forth a couple of times in the back of the head.  You will take a stitch in exactly where the thread is coming out, bring it across the back of the head in a large stitch and exiting somewhere else on the back of the head.  Do this at least twice so that you have anchored off and not made any stitched.  Pull firmly and cut under tension so that the thread disappears back into the head.


And you are done!  If you have any dimples at the back of the head you can either firmly scratch then with your thumb nail if they aren't too deep, or lightly felt a small amount of fibre into the dent to hide it.  I find that scratching this patch and felting again helps to hide it more.

I hope these tips help and that you find my method for making a nose and mouth useful for your future bears, cats, rabbits and more!

Happy felting!


Friday, 12 November 2021

It's Show time!


Let the show begin!

Ebearshow is the best online show for artists and collectors alike!  This is the last show for the year and it couldn't be easier to vote and then buy in a couple of weeks time!
You can head over to vote for your favourites now, then during the last weekend of this month the show is on for 3 days!


Wednesday, 3 November 2021

Making little wings! A Little Handfuls mini Tutorial!


Hi Folks!  So glad to see you again!  I thought you might like a quick tutorial for making some really basic wings for you Mini Bears and other creatures!  This is an excerpt from my book so if you want to learn how to make the bear as well please check it out in your local library or bookstore! :)


To start with you will need a permanent marker, shrink plastic, scrap paper, a single hole punch and scissors.  If you don't have shrink plastic have a rummage through your recycling.  You can actually use certain plastics you already have.  I've had success with the clear kind of plastics you get some foods in.  These are very light, clear, disposable plastics.  In New Zealand we use them for protecting baked goods and berries in our supermarkets but you might need to research for your country!  When shrinking just use a low temp oven and keep an eye on them.
On your paper draw out some little wings.  I did this with two over lapping ovals, I first did them at the size I would like for the bear, then replicated them larger because the plastic shrinks by more than half once finished
Lay the shrink plastic over your 'pattern' and trace it out with the permanent marker.
Then flip the plastic and draw the wings again, in this way you will have a mirror image for the other side that is an exact match!
Cut these out in once piece per wing.
Use your hole punch to put one hole in the wing.  If you are making really large wings, ie not for a miniature bear and you have room for 2 holes it would be a good idea to make 2.  Then your wings will be more stable for the size.
Here you can see where I put the hole for mine.
Follow the instructions on your plastic for time in the oven.  Here you can see how much my wings shrunk compared to how big I cut them, I probably could have gone even larger with mine!
I do like his dinky little wings though!  Sew them on by looping back and forth through one wing at a time.  If you made 2 holes in each one you can sew them on like a button!

I hope this little tutorial was helpful for you!  Shrink plastic is really useful for making parts that are strong and unique for your creations!

Thursday, 7 October 2021

Guess what's new with Little Handfuls

 You won't believe it!  I finally started creating downloadable tutorials!  Now you can just pop on Etsy to buy and download instantly!  So far I have 2 up for purchase but there will soon be so many, it's very exciting!

This is Romeo Rabbit, the first of my downloads, he's one of the most requested creations!


I also have a limited one for Halloween which is Boo the Ghost Bear!


As we get used to a new normal, working from home and limited access to the things we enjoy, I hope that my little tutorials will bring some fun and joy to my fellow needle felters!

As always, creators can contact me for help and advice as they work along the step by step photos, just like in my books!

Happy felting!


Thursday, 2 September 2021

How did he get those cheeky cheeks? :)


Have you been trying to needle felt some cute bunnies but just can't get those cheeky cheeks right?  Here's a quite little 'how to' for you!

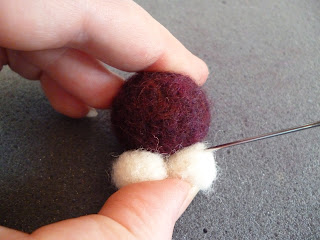
After you've felted the ball for his head, pull and mix the fibre for both cheeks.  Once mixed split into two balls and work back and forth, felting them down to the same size.


Here I've shown you how much the ball has shrunk as I've felted to give you an idea how much fibre to use for the cheeks.  It does shrink down a lot.  Don't felt them too hard though, just firm.


To attach the balls hold them both in place and 'tack' them on with a few deep pokes to check you are happy with placement.  If they look ok carry on.  Work slowly 


I'm happy with the placement so change down to a finer needle to keep working the cheeks until they are firmer and well attached.  As you work, keep the needle on the angle above, like you are felting one ball into the other.  This way you won't end up with a gap between them.


Want to needle a nose too?  Just take a smaller amount of fibre, felt into a firm ball and then attach, poking downward so that it sits snugly on the cheeks with no gaps.


I just love the way these turn out, they are also great for other animals like cats and dogs!

I hope you enjoyed this quick 'how to'. Stay tuned for more and feel free to make a request if you need help with anything.

You can also join our subscriber group over on facebook at just $10usd a month.  Live classes, and lots of fun.  Click here to visit my fb page  for more info.


Sunday, 11 July 2021

How to Thread Joint your Needle Felted Critters Arms and Legs

 Today I'm sharing a step by step series of photos to help you with your thread jointing.

When we want to make movable joints on a solid felted object we can't add any hardware like cotter pins or plastic joints, we have to 'sew' the parts together.  But we need to do it in a way that allows them to be moved and posed.

When I do thread jointing I like to use dental floss, I've used it for about 20 years and still have my first ever bears.  Floss is easy to tie and very strong.


  First lay your creation out with the parts where you will want them to be when they are attached, so each arm and leg on the side where it will be attached.


Then, taking about 12 inches of floss (I measure it from my wrist to my elbow to save getting a ruler out) thread about 2 inches of the floss through the needle.

Take the needle INTO the inside of the leg, where it will touch the body, and out the other side.


Here you can see the floss going through the leg and the amount of thread left for tying off at the end.  Just leave the end loose for now, about 2 inches or so long.


Next take the needle back into the leg NEXT TO where it came out.  This creates a small stitch but it won't be noticeable.

Come out NEXT TO the tail end of thread on the other side.


You can see here that both threads are now on the 'inside' of the leg and if you put it back next to the body it gives you an idea of where you will now run the thread through the body to attach

Run your needle through from one side to the other.  Check it from all angles to make sure it is sitting straight.

Pull the thread through, the previously threaded leg will pull up next to the body.  Don't pull too firmly.

Now you can go through the other leg and back, just as we did for the first leg.
You can now take the needle back through the body and out at the other side, this should be exiting the body NEXT TO the thread that you can see going in.
PLEASE FOLLOW THE STEPS TO KNOT AND TIE OFF!  DO NOT JUST TIE A KNOT AND CUT THE FLOSS!!  Tie the first half of your knot and PULL FIRMLY.  You should check the placement of the legs now before you finish tying that knot.  Happy with it?  Finish tying the knot but then flip your work over and TIE IT AGAIN on the other side!  We aren't done yet though so DON'T CUT IT YET!

Now take your needle and re-thread the floss back onto it, both pieces.  Once threaded onto the needle, take the point of the needle BETWEEN the leg and the body, push the needle into the body and it can come out anywhere you like, that doesn't matter too much as long as it doesn't come out the other leg!!  :)

Pull it right through, then cut the thread UNDER TENSION, so that means that while you are pulling firmly, you are cutting with your other hand.  A bit fiddly but by doing this the end of the thread will go back into the body and you can't see it!  These legs are NEVER coming off! :)
Now do the same for the arms!


I hope you found this helpful.  I get asked all the time how to do thread jointing and it's so hard to explain, you really need to 'see' it! :)

Feel free to send me a message either here or on my facebook page at Little Handfuls

www.facebook.com/littlehandfuls

Happy felting!


Tuesday, 22 June 2021

Needle felt a Cupcake Pin cushion!


I wanted to share something with you from my first book!  This was published a few years ago, so you might have seen it before, but if not I've just put together a quick version of this project for you.  You can see more of this one and others in the book which is still available to order in your local store or on Amazon.


Here's what you'll need! 

Foam to work on                    Core fibre                 Muffin coloured fibres

Felting Needles (sml & lge)   Felt sheets                Scissors and Ribbon


Taking your core fibre, wind it firmly around something, a pencil, chopstick, skewer or your finger!  The more firmly it's wrapped the less felting you need to do overall.  So get it as firm as you can, and needle it as you go if that helps as it can slip about as it gets bigger.


I like felting larger pieces like this one with a multi tool.  You can either buy them or make your own.  Let me know if you would like instructions on how to make yours but you can either use an oven bake clay, or just rubber band them together.  3 is usually a good number.


As you're felting try and created a rounded top and a flat bottom.  I find it helpful the press the flat part on my table top and then quickly felt over the surface fairly deeply.  Do this a few times and it should help you get a nice flat side.  As it starts to firm up you can change to your single needles but still use a large grade needle at this stage.


Here you can see me shaping the top, the bottom looks quite firm and flat now!


Time to start the colouring our muffin!  So I've mixed the fibre I want to use for the cake colour, this is where you will decide if it's chocolate, vanilla or red velvet!  Of course you can make it any colour at all and if you were my kids it would be green or purple!

Mix it well.


Here you can see me felting it with my multi tool again but you can use single needles at any time if that's what you have.

For this stage, make sure it's a large enough piece to cover the top of your cupcake and felt the surface, then flip and felt the other side.  

Do this a couple of times before applying to your cake.


Here you can see my applying the colour to the top of the cake.  

Start in the centre and work your way out to the sides.  This way you can make sure that it is going to go far enough down the sides and add small patches of fibre if there are gaps etc.


Here you can see I have finished covering the top and bottom.  I didn't bother with the middle as the next step will cover it!  

You could get away with not doing the bottom too if you were actually more lazy than me, but I'm sure you're too fussy for that!

:)

Next you will take your sheet of felt and measure around the cupcake marking in how wide you will need this strip (so making a mark where the bottom of the cake is) and then taking the felt all the way around plus an extra inch or so over overlap, and mark that too.  Overlap is needed as the strip will get shorter as you work around the base.

You can then cut your strip out using those markings.


Here I'm showing you where you will mark the bottom of the strip or if you are lazy like me you might just cut all the way around while you hold it in place.

You can see a little snip on the top edge which is where I marked the length.

If you want to be more precise you can always make this in paper first and use it as a template.


Next you will attach one end of the felt sheet to the cupcake.

Make sure you have lined this up with the bottom of the cake so that it finishes right at the edge.


Loosely holding the strip in place you will then make straight lines by going back and forth along the same line to create these little indents.

Do not hold the strip too tightly against the side of the cake or it will sit on the surface and not make a nice indent.

Do this all the way around until you reach the end.


You should have something that looks like this by this stage.

Time for the icing!


Taking the fibre for your icing you will mix it and then felt it as you did for the previous covering.  But this time go a little smaller so that your icing doesn't completely cover the top.


Once you have felted this a few times over you can work around the edge to create a nice, blobby looking shape to represent your icing.

Check out the finished picture of my cupcake to give you an idea of shaping.


You can see I've left some of the cake visible under the icing, no point covering it all up!  Work along the edge to define the shape and to make it look a bit more 3d.


Here you can see how I shaped my topping, the icing dribbles a bit down the side.  

You can exaggerate this more if you like and have the icing dribble right down onto the felted strip.


Now for that drizzle of toffee on the top.

There are many ways you can decorate the top of your cake and this is just one but I thought it looked pretty good.

Taking a small amount of fibre pull it out into a fine strip and then twist it to make it almost like yarn.


Here you can see I have laid it out in the pattern that I want to make.

I then start at one end and start felting.


Working along the fibre you can go back and forth till it's well attached. 

Felt along the edges with your needle angled toward the loose fibre as you work along the sides of this final layer.


And it's all done!  

I've just added a bow around the 'paper' casing and the pins in the top have little pearl beads on them which looks great on any style cupcake.

I hope you enjoy making this pincushion, have a go a some different styles.

You will find inspiration when you search online for cupcakes too I'm sure!

God bless and Happy Felting!

Liza Adams