Showing posts with label tutorial. Show all posts

Tuesday, 1 February 2022

Sewing a nose on your handmade bear, bunny, cat etc! Free Tutorial


Often when we are learning a new craft, theres a lot to take in.  With needle felting, for example, you are learning how to judge what fibre and needles you have.  How to know what the right amount of fibre would be for each part.  You'll be learning how to shape the limbs and to thread joint them all together!  So yet another thing you need to learn is making a nice, simple nose.  

Often it's these things that we neglect to learn more about.  We just muddle through when we get to this part and hope for the best.  But the nose is just as important as the eyes and ears, the balance of the face really effects how your little character will turn out, and whether he is stern, cute, lovable, sad etc.

For this tutorial I'm going to take you through making a basic nose, this is how I make most of my noses, I rarely get more technical unless I've made something larger or more deserving of something extra special.  Why get super complicated if you don't have to right?


So to start off with you will already have your head and be ready to start the nose.  I use the finest crochet thread you can find, this is thick and usually I use black or brown, but you can also use embroidery thread (the kind that comes as 6 threads together) and just split it into 3 threads or less.  Thread it onto a longish needle (one that can go right through your head as you will need to do that a couple of times) and use it as a single length with no knot.

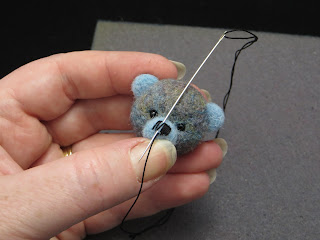
In the photo above you can see the needle has gone into the back of the bears head and the point is coming out roughly where the lower bottom corner of the nose would be.  Pull the thread until the end just disappears into the back of the thread.

Here you can see me taking the needle into what would be the top of the nose, above where the thread is coming out.  We will be doing a running kind of stitch, making loops in and out along the nose.


You can see above I have made several stitches, working across the nose from one side to the other.  It doesn't matter at all that there are gaps in the stitching, this is what makes it perfect for a low stress, easy for beginners, nose!


We will fill in the nose by working back across to where we started and we can do this as many times as we need to, just try to make sure that the loops form a straight line on the nose, but you can work diagonally from one area to another when you take the thread into the nose and out where you need another stitch.


Once you have filled in the entire rectangle and you are happy with the size and shape you can finish with your thread coming out at the centre bottom.  This is so we can now make the mouth.
Pull the thread down to check placement, and decide how long you want to make this line.


You can see here that I'm taking the thread into the bottom of this line, and out to the side, where I want the mouth to go.  Pull this through but not too tightly.


Here I have turned the head upside down so that I can take the thread back into the end of the line we just made, and out to the other side to create the second half of the mouth.  This will form a 'Y' shape when we are done.


When you pull the thread through you will have stitched one side and have the thread ready to go back into the bottom of the line again to finish the second stitch.  When you make this last stitch take the needle into the bottom of the line, and right out through the back of the head.
To finish run the needle back and forth a couple of times in the back of the head.  You will take a stitch in exactly where the thread is coming out, bring it across the back of the head in a large stitch and exiting somewhere else on the back of the head.  Do this at least twice so that you have anchored off and not made any stitched.  Pull firmly and cut under tension so that the thread disappears back into the head.


And you are done!  If you have any dimples at the back of the head you can either firmly scratch then with your thumb nail if they aren't too deep, or lightly felt a small amount of fibre into the dent to hide it.  I find that scratching this patch and felting again helps to hide it more.

I hope these tips help and that you find my method for making a nose and mouth useful for your future bears, cats, rabbits and more!

Happy felting!


Thursday, 7 October 2021

Guess what's new with Little Handfuls

 You won't believe it!  I finally started creating downloadable tutorials!  Now you can just pop on Etsy to buy and download instantly!  So far I have 2 up for purchase but there will soon be so many, it's very exciting!

This is Romeo Rabbit, the first of my downloads, he's one of the most requested creations!


I also have a limited one for Halloween which is Boo the Ghost Bear!


As we get used to a new normal, working from home and limited access to the things we enjoy, I hope that my little tutorials will bring some fun and joy to my fellow needle felters!

As always, creators can contact me for help and advice as they work along the step by step photos, just like in my books!

Happy felting!


Wednesday, 16 June 2021

How to Needle Felt a Brooch or Pin, for beginners!


Felted Heart Brooch

Welcome to my first free tutorial!  In this short lesson I will assume you have some knowledge of needle felting and already possess the basic supplies.  If you have any questions regarding what you need or want more tips do feel free to contact me on my facebook page Visit me here!

To create this brooch you will need:

💜 Felting needles in Large and small sizes

💜 Fibre in 2 colours (Merino or similar works best)

💜 Foam or similar surface to work on

💜 Small safety pin or Brooch pin

Taking a small amount of fibre, perhaps enough to fit into your fist when closed, mix well and then lightly roll into a loose ball.  Begin felting this on your foam surface with your large needle.  Keep poking and turning as you go until it begins to hold together.

This is a good way to start a very sculpted project, because the fibres are a little firmer and already beginning to hold a shape, we can then sculpt it as we wish.

For these instructions I am working on making an oval but you could make any shape you like.  Here I'm using a multi tool that holds up to 4 needles but you can do this just as well with a single needle, it just takes longer.

Begin to flatten this ‘ball’ out by felting on one side, then flipping over and felting the other side.  

To make a nice edge on your brooch, hold it between your fingers and felt around the sides, needle going directly into the middle and between your fingers.  

This can be a bit scary as you are likely to feel the needle or even get poked but working around the edge this way you can create any shape and get a nice even finish.

Keep felting until you are happy with the shape, size and surface.


For this brooch I’ve just done a simple heart.  I used two colours of merino fibre and hand mixed them together to get the blend I wanted.  This is really useful if you don’t have a lot of fibre, or if you need a specific colour for a project. 


Just mix and rub between your fingers to get them nicely blended.  Then felt into a soft ball so we can begin to sculpt the shape.

To make the heart shape I have pinched the fibre between my fingers and felted along to make a side, then turned over and made another side creating the bottom point of the heart.

To make the top just work the needle down into the fibre exactly where you want the top of the heart to be, use the finest needle and just felt softly to coax it into shape.

Check the fit and then you can begin felting your decoration onto the brooch, remember to start in the middle working outward

 Then work along the edges to form nice, defined lines and make your work stand out.


Keep sculpting all over with your fine needle, not poking too deeply as in this smaller piece it will cause dents or holes that are hard to make disappear.

You can see that for the heart I had to work down into the crease at the top of the heart to keep that nice shape and make sure it didn’t stop looking like heart.

How are you doing?  Looking the way you imagined?  Don't despair if it's not, every piece I make turns out different from the last, it's all learning and you're still having fun.  I do find that often people will love something I made that I'm not happy with, we all have different tastes and abilities!


To finish we will just sew on the brooch back or safety pin.  This is easily done as you normally would and you can use knots for this as they won’t be seen on the back.

Just make sure you don’t take your thread through to the front and that your pin is hidden and sewn on securely.

I hope you really enjoyed making this first project with me.  I hope to post more over the next few months so do pop back to see what's new.  Don't forget to find me on facebook especially if you want to ask any questions!